Add System Voices
You can add custom system voices and use them.
How to
1. Prepare Voices
Prepare audio files for system voice (WAVE format).
| File Name | Scene |
|---|---|
| result_new_record.wav | Result - New record |
| result_rank_d.wav | Result - Rank D |
| result_rank_c.wav | Result - Rank C |
| result_rank_b.wav | Result - Rank B |
| result_rank_bb.wav | Result - Rank BB |
| result_rank_bbb.wav | Result - Rank BBB |
| result_rank_a.wav | Result - Rank A |
| result_rank_aa.wav | Result - Rank AA |
| result_rank_aaa.wav | Result - Rank AAA |
| result_rank_s.wav | Result - Rank S |
| result_rank_sp.wav | Result - Rank S+ |
| result_rank_ss.wav | Result - Rank SS |
| result_rank_ssp.wav | Result - Rank SS+ |
| result_rank_sss.wav | Result - Rank SSS |
| result_rank_sssp.wav | Result - Rank SSS+ |
| result_all_justice.wav | ALL JUSTICE |
| result_full_chain.wav | FULL CHAIN |
| result_full_combo.wav | FULL COMBO |
| result_all_clear.wav | Course mode - ALL CLEAR |
| scene_course_result.wav | Course mode - Course result |
| scene_select_mode.wav | Mode select (unused) |
| scene_user_box_confirm.wav | USER BOX - Voice selected |
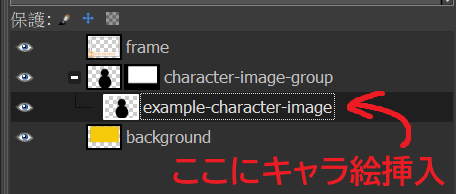
2. Prepare Voice Icon
Prepare a 370 x 254 PNG image for displaying in the system voice select screen.
Material
There is a material for making an icon in Game Folder/data/voices/image_material.xcf.
You can make an icon easily to insert your images in character-image-group layer with your photo editor like GIMP.
3. Prepare Voice Meta File
- Copy the above text and paste your text editor like notepad then save as
meta.txtin UTF-8. - Replace parts of the pasted text like the following:
<volume>Volume (0.0 - 1.0)<name>Voice name<desc>Description (optional)<notice>Notice (it will be show as a message once when selected) (optional)
- Save again.
4. Put Files
Create a folder named you want and put the prepared audio files, image.png and meta.txt in it. Then, put the voice folder like the following:
[Game Folder]
├ UMIGURI.exe
└ data
  └ voices
    ├ <Voice Folder>
    │  ├ meta.txt
    │  ├ result_new_record.wav
    │  ⋮
    │  ├ scene_user_box_confirm.wav
    │  └ image.png
    ⋮